
Drywall repair after water damage from True Day Water Damage Restoration: drying what can be saved and replacing what can’t. Based in South Jordan, UT and serving the Salt Lake Valley — live-answered 24/7 at (385) 247-9359. IICRC Certified Firm #927354-5258, Utah license #960332-3505.
Drywall Repair After Water Damage in South Jordan, UT
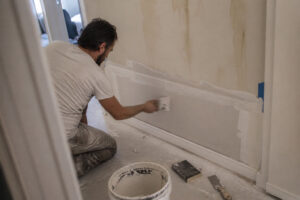
Water damage almost always affects drywall. Whether from a burst pipe, roof leak, appliance failure, or flooding, water saturates gypsum board rapidly — softening the gypsum core through dissolution of the calcium sulfate dihydrate crystal structure, staining the paper facing, enabling mold colonization of the cellulose paper substrate, and in severe cases causing complete structural failure of the panel. Properly restoring water-damaged drywall requires more than painting over stains or drying with fans — it requires assessment, appropriate removal where necessary, complete structural drying, and skilled replacement with texture matching and finish work that makes the repair invisible.
True Day Water Damage Restoration is a licensed Utah Contractor (#960332-3505) and IICRC-Certified Firm (ID #927354-5258), based at 11268 S 2865 W in South Jordan. We handle complete drywall repair and replacement as part of every water damage restoration project throughout Salt Lake County. Call us at (385) 247-9359.
What Happens to Drywall When It Gets Wet
Gypsum board is composed of a gypsum plaster core — calcium sulfate dihydrate in crystalline matrix — sandwiched between paper facings. Both components are vulnerable to water in ways that determine salvageability.
The gypsum core absorbs water readily and loses structural strength as calcium sulfate dihydrate partially dissolves and the crystal matrix softens. Severely saturated drywall becomes crumbly and dimensionally unstable. The paper facing — which provides tensile strength to the otherwise brittle gypsum core — absorbs water and becomes a growth medium for mold colonization. Common indoor mold species including Aspergillus and Cladosporium can germinate on damp drywall paper within 24 to 48 hours of water contact. Once mold has colonized the paper, the panel must be replaced — surface treatment does not eliminate hyphae that have penetrated into the paper fibers.
Water that saturates drywall also migrates by capillary action into the wall assembly behind it — wicking upward into the gypsum core and into the framing and insulation cavity. The true moisture extent in a water-damaged wall assembly is frequently substantially higher on the wall than the visible stain line suggests — because the liquid front is at the stain line, but capillary action has drawn moisture upward beyond it. FLIR thermal imaging cameras reveal this capillary migration in the wall assembly above the visible water line, defining the true removal boundary.
Water staining from minerals left behind as water evaporates — calcium carbonate, magnesium compounds, and organic matter — bleeds through standard latex paint indefinitely regardless of how many coats are applied. Hard water in South Jordan, supplied by the Jordan Valley Water Conservancy District at 7 to 10 grains per gallon, results in noticeable mineral deposits on drywall when water dries. To ensure that repainting is effective without bleed-through, a shellac-based stain-blocking primer is necessary.
When Drywall Must Be Removed vs. When It Can Be Saved
Drywall that can sometimes be saved: Panels from a Category 1 clean water source wet for less than 24 hours, where moisture meter readings confirm return to dry standard with professional drying, and where no structural softening or mold is present. In-place drying is appropriate only when verified by daily calibrated moisture meter readings — not by visual appearance or feel.
Drywall that must be removed: Any panel wet for more than 24 to 48 hours; any panel with visible mold on the paper facing; any panel that has softened or lost structural integrity; any panel exposed to Category 2 grey water or Category 3 black water; any panel where moisture meter readings remain elevated after drying efforts; ceiling panels that have sagged or bowed from water weight; and panels where removal is necessary to access framing and insulation for proper structural drying of the wall assembly.
Our Drywall Repair Process
Step 1 — Moisture assessment: FLIR thermal imaging and calibrated penetrating moisture meters map the full extent of moisture migration — including the capillary wicking above the visible water line — before any removal begins. The moisture data defines the removal scope.
Step 2 — Controlled removal: Clean cuts at structural members — studs, joists, and blocking — using scoring knives or oscillating tools. Cut to the nearest stud bay to create square edges for reconstruction. Wet or mold-contaminated ceiling drywall is controlled during removal to prevent sudden collapse.
Step 3 — Wall cavity drying: With drywall removed, industrial air movers are positioned directly into wall cavities and structural assemblies. Wet insulation is removed — it cannot dry effectively in place. Framing is treated with EPA-registered antimicrobial and dried to verified equilibrium moisture content before reconstruction.
Step 4 — New drywall installation: Appropriate type and thickness for each application — standard 1/2 inch for most walls, 5/8-inch Type X for fire-rated assemblies, moisture-resistant board for bathrooms, ceiling-rated board for overhead applications.
Step 5 — Taping and finishing: Multiple coats of joint compound, feathered and sanded to achieve a flat, invisible transition between new and existing drywall. The quality of feathering and sanding at the transition boundary is what makes a repair visible or invisible under raking light.
Step 6 — Texture matching: The most skill-dependent step. Common textures in South Jordan homes include orange peel, knockdown, skip trowel, smooth, and popcorn. Each requires different application technique and timing. We test texture application on a small area before committing to the full repair surface. In Daybreak’s contemporary craftsman construction — where orange peel is the predominant texture — we use spray-applied matching that replicates the specific stipple density of the adjacent original surface.
Step 7 — Priming and painting: PVA primer on new drywall; shellac-based or oil-based stain-blocking primer on any areas with residual staining or hard water mineral deposits. Finish paint matched to adjacent surfaces.
- Can water-damaged drywall be dried in place?
- Sometimes — when the panel is removed from standing water within a few hours, the gypsum core retains structural integrity, and there is no colonization of the paper facing. Panels in contact with water for more than 24 to 48 hours, Category 2 or 3 water, or showing any visual colonization must be removed.
- Why does mold appear through new paint after water damage repair?
- New drywall over framing that hasn’t completed structural drying absorbs residual framing moisture through the gypsum core and expresses it at the paper facing — where Cladosporium germinates. This becomes visible six to twelve weeks after reconstruction. It results from incomplete drying before reconstruction, not a defect in the new panel.
- Does insurance cover drywall replacement?
- Yes. Drywall removal, installation, taping, finishing, texture matching, priming, and painting are all included in the reconstruction scope under a standard HO-3 covered water damage event.
Learn more about our structural drying, mold remediation, and reconstruction services.
True Day Water Damage Restoration | 11268 S 2865 W, South Jordan, UT 84095 | (385) 247-9359 | Utah Contractor License: #960332-3505 | IICRC Firm ID: #927354-5258
What True Day guarantees on every job
The difference between "repaired" drywall and "restored" drywall
After a flood cut, the drywall rebuild is the single most visible part of the restoration — it is what the homeowner looks at every day for years. The industry’s reputation for "patched looking" rebuilds comes from a few specific steps that get rushed. Here is what the full repair actually requires and where the common shortcuts fail.
The seven-step drywall repair
- Hang new drywall to match thickness and type of existing (usually 1/2" standard, 5/8" on ceilings or where fire-rated). Mold-resistant "green board" in bathrooms and basements. Fastener spacing to code (8" on edges, 12" in field).
- Tape and first mud coat (bedding coat). Paper tape or mesh tape depending on joint. First coat fills the taped joint flush with the drywall face.
- Second mud coat (fill coat). Wider knife (8-10"). Levels the joint and feathers the compound outward 6-8" past the tape edge.
- Third mud coat (finish coat). Widest knife (12"+). Feathers out 12-16" from the joint center. This is the coat that disappears into the surrounding wall.
- Sand to a smooth-flat finish between coats and after the final coat. Dust is controlled with vacuum sanders — do not skip this step; dust in subsequent coats produces a gritty finish.
- Prime the new drywall and the mud joints. New drywall paper absorbs paint differently from the surrounding factory-primed-and-painted surface. Priming equalizes the absorption so the final paint reads the same across the repair.
- Texture match + paint. See below.
The texture match (the hard part)
Utah ceilings and walls use several texture types that each require different equipment and technique to match:
- Smooth (Level 5 drywall finish) — common in newer high-end homes. Requires skim-coat over the entire repair area. Hardest to patch invisibly; often requires repainting the whole wall to avoid visible transition.
- Light orange peel — common in mid-grade new construction. Sprayed-on finish; matching requires a hopper gun and a test on cardboard before applying to the wall.
- Heavy orange peel / splatter knock-down — common in builder-grade construction. Sprayed, then knocked down with a drywall knife at the right dry-time window (usually 10-20 minutes after spray).
- Hand-trowel textures (skip-trowel, Spanish knockdown) — often applied by a specific tradesperson; matching requires practice and sometimes bringing in a texture specialist.
- Popcorn ceilings (pre-1990) — avoid patching if possible; retro-fitting popcorn is difficult and the texture is often asbestos-containing in pre-1980 construction. Smooth-skim and repaint the whole ceiling is sometimes a better scope.
The paint blend
Even with a perfect texture match, a spot of fresh paint next to aged paint looks different. The solution depends on wall and ceiling specifics:
- Blend-paint into the field — feather the new paint 2-3 feet past the repair edge, working it thinner as it approaches the un-repaired paint. Works for low-sheen (flat, eggshell) paints with similar age.
- Repaint corner-to-corner — paint the entire wall from one corner to the next, so the only visible edge is a corner (where the eye expects a color transition). Required for any paint older than ~3 years, higher-sheen paints, or any color darker than off-white.
- Repaint ceiling-to-ceiling — on a ceiling, repaint the entire ceiling plane. Ceilings show patches more than walls because of ambient lighting.
Drywall repair after water damage — frequently asked questions
Dry it in place, or tear it out? The IICRC S500 decision.
Every wet material in your home gets one of two verdicts. The difference between a right call and a wrong call is thousands of dollars of avoidable rebuild cost — in either direction. These are the standard-of-care rules we work from.
| Material | Dry in place when… | Tear out when… |
|---|---|---|
| Carpet | Dry in place if the water is Category 1 (clean), caught in the first 24 hours, and extraction + air mover + dehumidifier can reach a dry benchmark within 72 hours. | Tear out if water is Category 2 or 3, if the pad is saturated and compressed, or if drying stalls above the dry benchmark after 72 hours. |
| Carpet pad | Almost never. Pad holds water, cannot be sanitized reliably, and is cheap to replace relative to the mold risk of keeping it. | Tear out in nearly every real loss. Pulling and replacing pad while keeping the carpet is standard IICRC practice for Category 1 jobs. |
| Drywall | Dry in place if the wet height is under 24 inches, Category 1 water, no visible sagging, and in-wall moisture clears to benchmark within the drying window. | Flood cut (remove the bottom 24 inches) if the water is Category 2/3, insulation behind is wet, drywall is sagging, or benchmark isn’t reached. |
| Wall insulation | Fiberglass batt almost never dries acceptably in a wall cavity. | Tear out wet batt insulation as a matter of course when drywall is opened. |
| Hardwood floor | Dry in place is possible for engineered hardwood or solid hardwood with specialized drying mats, if caught in the first few hours and water is Category 1. | Replace if water sat more than ~24 hours, if cupping/crowning is visible beyond cosmetic, or if subfloor delamination has started. |
| Cabinets & vanities | Dry in place if only the toe-kick is wet and MDF structure is intact. | Replace if MDF has swelled or delaminated, or if sewage/Category 3 water contacted food-prep surfaces. |
A restoration crew that tears everything out, every time, is maximizing their invoice. A crew that dries everything in place, every time, is risking a mold callback. The right answer is material-by-material, measured on day one and re-measured daily — which is why our moisture logs are a daily deliverable, not a closing-day report.
Dry in place, flood-cut, or full-sheet replace — the IICRC S500 decision
Not every wet wall needs demolition. The decision isn’t a judgment call — it comes from IICRC S500 criteria based on water category, saturation height, moisture-meter reading, and how long the water sat. Here is how we decide on arrival.
| Factor | Dry in place | Flood-cut (remove bottom 2 ft) | Full-sheet replace |
|---|---|---|---|
| Water category (S500) | Category 1 (clean) only. | Category 1 or 2 with limited wick height. | Category 3 (sewage/outdoor), or extensive mold growth. |
| Saturation height | Low wick, no visible saturation above baseboard. | Water line visible between baseboard and 2 ft. | Water line above 2 ft, or stain/paint-bubble above cut height. |
| Moisture-meter reading | Returns to dry benchmark within 72 hours of air mover + dehu placement. | Lower portion stays elevated after 72 hours; upper portion reads dry. | Readings stay elevated across the sheet, or insulation is saturated and non-salvageable. |
| How long water sat | Caught within 24–48 hours. | 24–72 hours in the cavity. | 72+ hours, or any Category 3 regardless of time. |
| Mold risk | Dried fast enough that S520 Condition 1 is likely preserved. | Removal exposes stud bay to drying; prevents Condition 2 from developing. | Mold already visible, or cavity cannot be dried without opening. |
What drywall repair looks like from your side
The drywall + paint phase of reconstruction is often the longest-feeling part of a water-damage project. Here’s the realistic timeline + what you’ll see each stage.
Timeline for a typical repair
| Stage | Duration | What’s happening |
|---|---|---|
| Hang drywall | 1 day for small-medium room | Cut + attach new drywall sheets to studs. Loud phase. |
| Tape + first coat mud | Half-day work + 24 hr dry | Seams taped, first joint-compound layer applied. Dust begins. |
| Second coat mud | Half-day + 24 hr dry | Second compound coat, sanded between coats |
| Third coat + final sand | Half-day + 24 hr dry | Finish coat, final sanding. Peak dust day. |
| Texture match | Half-day + 24 hr dry | Spray or hand texture to match existing wall surface |
| Prime | Half-day + 24 hr dry | Primer coat for paint adhesion |
| Finish paint | 1 day small room | Final color coat, 2 coats typical |
| Total elapsed | 5-7 days typical | Can compress with fast-set compounds for urgent cases |
The dust problem
Drywall sanding generates fine dust that reaches every surface in the home despite containment. Standard practices to reduce it:
- Containment wall at the room threshold (plastic sheeting + zip door)
- HEPA vacuuming at end of each sanding session
- Dust mats at doorways to catch tracked particles
- HVAC filter change at end of job
Texture-match realities
Matching an existing wall texture (knockdown, orange-peel, skip-trowel, smooth) is never perfect. Close enough that paint hides the transition is the goal. On accent walls or very prominent features, you may notice the patch outline in raking light.
Paint-match realities
Fresh paint on new drywall doesn’t match aged paint on existing walls, even using the exact same can. UV, cleaning, time all shift paint color. Options: paint corner-to-corner for a cleaner result, accept the slight tonal difference, or repaint the whole room. We’ll scope what fits your budget + priorities.
When occupancy during work makes sense
- Single-room repair: Usually fine. Close door, run containment, continue daily life.
- Multiple rooms or main living area: Case-by-case. Dust affects everything during sanding phase.
- Kitchen or bathroom repair: Expect 3-5 days of limited function in that room.
Drywall and mold — the hard rules
Drywall is cellulose-faced gypsum board. Once it hosts mold growth, cleaning it is almost never the right call. Here are the hard rules we work by:
Mold-resistant drywall — product categories, where each belongs
“Mold-resistant drywall” is a category, not a single product. There are three sub-categories and they belong in different rooms. Here’s how to choose for the replacement spec:
| Product category | Where it belongs | What it costs vs standard | Limitations |
|---|---|---|---|
| Standard paper-faced drywall | Dry interior walls, bedrooms, closets, dry basements | Baseline | Paper facing is a food source for mold if it gets wet; not for moisture-prone rooms |
| Paperless gypsum board (fiberglass-faced) | Bathrooms, laundry rooms, kitchens, basement walls below grade | ~20-40% more than standard | Fiberglass facing is scratchy if left exposed; must be primed before painting; not a substrate for tile without additional backer |
| Cement board / fiber-cement | Shower surrounds, wet-wall tile substrate, exterior-exposed interior walls | ~2-3x standard | Heavy; requires special fasteners; overkill for non-tile applications |
| Mold-resistant drywall with paper facing (treated paper) | Transitional areas — hallways near bathrooms, upper walls above tile | ~10-20% more than standard | Still has paper facing; better than standard but not equivalent to paperless; marketing claims often exceed real performance |
Our replacement spec in a mold-related job: paperless gypsum in any room where mold was found or where moisture is a recurring risk; cement board for tile-wall substrates; standard drywall only where neither water nor mold risk is elevated.
Buyer-visible outcome: the walls look the same after paint. The difference is below the surface. If the next loss happens in year 3, paperless gypsum limits the damage; standard drywall feeds it.
Texture matching after drywall repair — honest about what blends and what doesn’t
Drywall patch texture is one of the places where “restoration” vs “repair” is visible. A patched area that’s obviously patched is a repair; one that disappears into the wall is a restoration. The difference is in the texture match, which depends on things that aren’t under our control. Here is the honest version:
What we commit to: honest conversation about the texture at scope-writing time, specifically about what the finished patch will look like. If you want “invisible,” we tell you what that will cost (sometimes full-wall repaint). If you want “functional,” we tell you the patch will show.
Mud and tape — why a quality patch takes 3 days, not 3 hours
A finished drywall patch that disappears into the wall needs multiple coats of mud with drying time between each. Rushing this is why some repair patches look like repair patches. Here’s the actual sequence:
Why this matters for your scope: a patch job scoped for 1 day of “drywall work” probably skipped coat buildup. A patch scoped for 3-4 days of drywall work is doing it right. The difference is visible on the wall six months later.
Which board goes where in a rebuilt South Jordan home
After water or mold damage, the replacement board should match the room, not just the hole.
| Board | Good for | Not for |
|---|---|---|
| Standard drywall | Bedrooms, living areas, dry interior walls | Bathrooms, below-grade walls with a moisture history |
| Moisture-resistant (green board) | Bathroom walls outside the shower, laundry rooms | Tiled shower and tub surrounds |
| Mold-resistant (often purple-faced) | Basements, laundry rooms, walls that were wet before | Direct water exposure behind tile |
| Cement board | Tile backer in showers and tub surrounds | General walls (heavier, harder to finish) |
Mold-resistant board slows growth; it does not make a wall waterproof. Fixing the moisture source still comes first.