
Attic leaks: roof leaks and ice dams soak insulation and drywall from above, often long before a ceiling stain appears. True Day maps the wet area with FLIR thermal imaging, removes soaked insulation and dries the framing. Live-answered 24/7 from South Jordan, UT.
Attic Leak Damage in South Jordan, UT
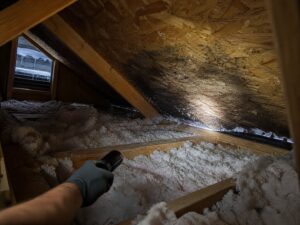 Attic leaks in South Jordan homes follow a predictable seasonal pattern — one tied to the Wasatch Front’s January and February freeze-thaw cycling more reliably than to any specific construction quality issue. The conditions that produce ice dam formation recur every year with enough consistency that attic moisture damage from this source is not a rare event. Homeowners often find this issue unexpectedly, weeks or even months after it starts, usually when they notice a stain on the drywall below the ceiling or when they finally check the attic after a year and discover extensive mold growth on the decking.
Attic damage has a timing problem that makes it harder to respond to than almost any other water event. The ice dam forms in January. The meltwater enters the attic in January or February. But the ceiling stain that tells the homeowner something happened may not appear until March — weeks after the event, when the slow migration of water through insulation and drywall finally reaches the paint surface. By then the homeowner is not sure when it happened or whether it is still happening. And the attic itself — which would answer both questions in thirty seconds with a flashlight — is the room in the house that nobody opens between Thanksgiving decorations and the Fourth of July. We have found attic assemblies in South Jordan with two and three seasons of accumulated Cladosporium growth on the decking — growth that was adding to itself each winter — that the homeowner discovered only when they went up to retrieve something stored there. The ice dam had done its work quietly for years.
True Day Water Damage Restoration is a licensed Utah Contractor (#960332-3505) and IICRC-Certified Firm (ID #927354-5258). Call us at (385) 247-9359.
Ice Dam Formation — The Mechanism
Ice dams form when heat loss through an inadequately insulated attic floor warms the roof deck — melting overlying snow from below. The meltwater flows down the roof slope toward the eave, where the roof deck temperature is colder because no heat escapes from the unconditioned attic space beyond the exterior wall plane. The meltwater refreezes at the cold eave, accumulating as an ice dam. Subsequent meltwater backs up behind the dam, pooling on the roof surface above it. When the pooled water depth exceeds the height of the ice dam, or when it finds a pathway under the roofing membrane at a nail, seam, or damaged section, it flows under the membrane and into the attic assembly. This is a thermodynamics problem — not a roofing quality problem and not a weather severity problem. The ice dam forms because the attic is too warm, which is a function of attic insulation adequacy and air sealing of ceiling penetrations. A well-insulated, air-sealed attic maintains a cold roof deck throughout the winter, produces no meltwater above the eave, and does not form ice dams regardless of snowfall. The current International Energy Conservation Code recommendation for this climate zone is R-49 attic floor insulation — a threshold many South Jordan homes built before 2010 do not meet.What Ice Dam Intrusion Does to Attic Assemblies
Water entering the attic from ice dam intrusion saturates the oriented strand board roof sheathing — the engineered wood panel product used as roof decking in the majority of South Jordan’s residential construction. OSB absorbs moisture readily through its resin-bonded wood fiber composite and does not dry effectively as long as it remains covered by roofing materials and insulation that restrict airflow across its surfaces. Repeated saturation over multiple winter seasons — each ice dam event wetting the sheathing before it fully dried from the previous event — creates the sustained wet cellulose conditions that Cladosporium colonizes on the underside of the decking. Cladosporium on attic sheathing is among the most common mold remediation scenarios we encounter in South Jordan’s established neighborhoods and in the later-phase Daybreak construction with wide-eave hip and gable rooflines. Attic insulation saturated by ice dam intrusion loses its R-value while wet — further worsening the heat loss through the attic floor that caused the ice dam in the first place. Wet fiberglass batts that partially dry between events retain compressed, clumped fiber that does not recover full performance even after drying. The water that enters the attic does not stay there. It migrates through the ceiling assembly into the living space below — appearing as ceiling stains, wet drywall, or active drips typically at the eave or at ceiling fixtures near the exterior wall plane. The interior sign appears days to weeks after the ice dam event, because the water moves through insulation and drywall at the slow rate of capillary action and gravity — not at the rate of the original intrusion event.An Attic Leak Project in an Established South Jordan Neighborhood
In November 2022, we were contacted by a homeowner in an established South Jordan neighborhood near 11200 South — a 2001-era two-story home with a hip roof and wide overhanging eaves, the roofline geometry that was common in production-builder construction of that period and that is particularly prone to ice dam formation because the long eave extension creates a substantial unheated roof surface above the exterior wall plane where refreezing reliably occurs. The homeowner had noticed a brown ceiling stain in the master bedroom — roughly 14 inches in diameter, located approximately two feet from the exterior wall — that had appeared in late March and had not grown since. She had assumed it was from a roof nail pop or a loose shingle and had painted over it. The following November it reappeared, slightly larger, in the same location. The pattern — a stain that appears in late winter or early spring and reappears the following year in the same location — is the signature of ice dam meltwater intrusion. The stain appears when the water that entered the attic in January finally migrates through the insulation and ceiling assembly to the paint surface in March. It stops growing when the ice dam cycle ends and the attic dries. It reappears the following year because the ice dam forms again in the same location, for the same reason — insufficient attic floor insulation allowing enough heat loss to warm the roof deck and melt the overlying snow. Our FLIR thermal imaging of the master bedroom ceiling showed a cold zone consistent with residual attic moisture at the stain location and extending 18 inches toward the exterior wall — the path the meltwater had followed through the insulation from the ice dam entry point at the eave. When we accessed the attic, we found Cladosporium colonization on the underside of the oriented strand board sheathing at the eave — covering approximately 22 square feet of decking in a fan pattern radiating from the point where the meltwater had been entering for two seasons. The insulation R-value in the affected area was R-25 — the original 2001 installation — against the current International Energy Conservation Code recommendation of R-49 for this climate zone. The attic had been losing enough heat through this section to reliably melt overlying snow and form an ice dam at the eave every winter. We remediated the Cladosporium — wire brushing the affected decking, two antimicrobial treatment passes, and a film-forming encapsulant — and coordinated insulation upgrade to R-49 through a licensed insulation contractor before closing the ceiling. The ceiling drywall at the stain location was replaced and repainted. The homeowner’s policy covered the remediation and reconstruction as weather-related roof leak damage. Total approved: $6,340. Deductible: $1,000. She told us at the final walkthrough that she had been watching that stain for two years, trying to decide whether it was serious enough to call someone. She had Googled “ceiling stain after winter” and found forum posts suggesting it was probably a nail pop or condensation and would dry out on its own. It had not dried out on its own. It had been accumulating Cladosporium on the sheathing above her bedroom every winter, at the slow pace that makes attic damage so easy to rationalize away — not dramatic enough to call someone, not benign enough to forget. That specific kind of low-level worry, sustained over two winters, resolved in a single afternoon when we opened the attic hatch and she saw the thermal imaging results. She knew exactly what she was looking at and exactly what needed to happen. The uncertainty was harder than the answer. The stain on the ceiling was the most visible and least important part of the problem.Our Attic Leak Damage Response
FLIR thermal imaging of ceiling surfaces from the living space to identify moisture migration pathways before attic access; calibrated moisture metering of all affected sheathing sections and ceiling drywall; removal of saturated insulation; structural drying of the attic assembly with appropriately positioned air movers; Cladosporium remediation of colonized sheathing using wire brushing, antimicrobial treatment, and encapsulant; and coordination of attic insulation replacement and air sealing improvements to reduce the probability of recurrence. We document all findings for the homeowner’s insurance claim — ice dam damage is typically covered under the dwelling coverage of standard HO-3 and HO-5 homeowner policies.- How do I know if my ceiling stain is from an ice dam or a roof leak?
- Ice dam stains appear in late January through March within 12 to 36 inches of an exterior wall — below the eave zone where meltwater migrates inward from the eave entry point. Roof membrane leaks can appear at any location below a penetration. FLIR thermal imaging of the attic identifies the entry location and migration pathway without destructive investigation.
- Will fixing the roof prevent future ice dams?
- A roofing repair fixes the specific membrane defect but not the ice dam formation mechanism — heat loss through under-insulated ceiling planes. Without insulation upgrade to R-49, the ice dam continues forming each winter. The permanent solution is upgrading insulation above the affected section to reduce heat loss below the ice dam formation threshold.
Attic water damage — and the four Utah causes
Water that enters the attic migrates downward through insulation into ceiling drywall, often spreading several feet away from the actual roof-plane entry point. By the time the ceiling stain is visible, the roof-side source is rarely directly above it.
The four Utah causes we see
| Cause | When it happens | Signature |
|---|---|---|
| Ice dam | January-February, after a warm attic + cold-roof-edge cycle | Water pushes under shingles at the eaves; ceiling stain near exterior walls |
| Vent-pipe or chimney flashing failure | Any heavy rain or snowmelt event | Stain directly below the penetration point (ceiling stain tracks to the flashing) |
| Condensation in an unvented or poorly vented attic | Winter — moist indoor air hits a cold roof deck | Rust on nail tips, damp insulation widespread, no single leak point |
| HVAC condensate overflow | Summer, especially cooling season | Steady drip from a specific unit, stain directly below an attic air handler |
Ice dams specifically
Warm air from the house heats the roof deck. Snow melts and runs down the roof. At the cold eave (which the house isn’t heating), it refreezes into an ice ridge. The next melt backs up behind that ridge and pushes under shingles into the attic. Fix is attic air sealing + insulation + ventilation, not just removing the ice (which only works for this storm).
Condensation vs. leak
A leak has a point source: trace it up from the ceiling stain. Condensation is diffuse: it shows up as damp insulation across many bays, rust spots on nail tips, and in extreme cases frost on the underside of the roof sheathing. Fixing a leak is a roofing repair; fixing condensation is an air-sealing + ventilation job.
Attic leaks: ice dam, condensation, plumbing, or roof penetration?
Water in the attic has four very different sources, and they look similar from the ceiling below but need completely different fixes. Here’s how to tell which one you’re dealing with:
| Source | Season / signs | Where water enters | Fix side |
|---|---|---|---|
| Ice dam | Winter, after snow + freeze cycles; stains near the eaves and exterior wall-ceiling intersection; icicles at the gutters | Melted snow pools behind an ice ridge at the eave, backs up under shingles | Roofer + insulation contractor (fix insulation + ventilation to prevent next time) |
| Condensation / ventilation | Winter, often widespread across the attic deck; frost on the underside of sheathing; wet attic insulation but no obvious roof damage | Warm moist indoor air escapes to the cold attic and condenses on the roof deck | Insulation contractor (seal air leaks, improve ventilation); not a roofer issue |
| Plumbing (vent stack or supply) | Any season; stain next to a plumbing vent or supply line in the attic; concentrated location, not spread | Vent stack flashing failure, or a hidden plumbing line (humidifier line, water-heater makeup) leaking | Plumber + roofer for the vent flashing |
| Roof penetration failure | Any season but obvious in rain; stain under a specific roof feature (chimney, skylight, vent, pipe, satellite dish mount) | Flashing failure at the penetration | Roofer |
| Shingle failure or roof damage | Any season, especially after wind or hail; stain in the open field of the ceiling, no feature above it | Lifted, cracked, or missing shingle | Roofer |
What we do and what we don’t
- We handle the water mitigation inside — drying the attic insulation, drying affected framing, treating any mold that started, replacing ceiling drywall if needed
- We don’t do roofing — a roof penetration or shingle issue needs a roofer, and we’ll give you a name of a Utah-licensed roofer when needed
- Insulation and ventilation repairs are in our GC scope when the leak was ventilation-related; we can scope those in the same job
Why misdiagnosis is expensive
- Treating a ventilation condensation issue by patching the roof fixes nothing — the condensation returns next winter
- Treating an ice dam by scraping snow off the roof solves this winter but doesn’t fix the underlying insulation issue
- Treating a plumbing leak as a roof leak means the leak keeps dripping after the roof is “fixed”
Safely accessing attics + what we look for
Attic access and inspection has specific safety considerations and specific items we check. Attics are hot, dusty, hazardous (joists not continuous floors), and sometimes contain rodent or wasp activity. Here’s how we handle it and what we’re looking for:
- Attic temperature in Utah summer can exceed 140°F — inspection scheduled for morning or evening when possible
- Attic flooring confirmed structural (not just insulation on joists)
- Walking boards or plywood laid across joists before any steps off the access
- Flashlight + headlamp (both; attics are dark and your hands may be busy)
- Respirator for dust and insulation particles
- Long sleeves and gloves (fiberglass insulation handling)
- Partner on the ground for communication (one person down, one up)
- Known-good access path identified before entering farther
What we visually inspect
- Roof deck underside — wet staining, visible drip paths, nail-point moisture, discoloration patterns
- Rafters and trusses — moisture staining, mold growth, structural damage
- Insulation condition — wet, matted, settled, visibly moldy, rodent-affected
- Vent penetrations — plumbing stacks, bathroom exhaust, kitchen exhaust — flashing condition
- Chimney and skylight flashings
- Soffit and ridge ventilation openings — blocked by insulation (common issue causing condensation)
- Visible HVAC ducts — condensation signs, torn insulation
- Access to and condition of attic hatch sealing
What we check with instruments
- Moisture meter on wet-looking areas and on seemingly-dry areas as controls
- Thermal imaging in specific suspect zones (especially condensation areas)
- Humidity reading in attic ambient (compared to outside and interior)
Common findings that drive the diagnosis
- Wet rafter underside around a specific feature (plumbing vent, chimney, skylight) — roof penetration flashing failure — roofer scope
- Wet in widespread pattern across the deck underside — condensation from ventilation issue — insulation / vent scope
- Wet near the eaves after winter — ice dam — combination of roof + insulation + ventilation issue
- Mold on north-side rafters without visible wet — chronic ventilation issue causing seasonal condensation
- Rodent droppings + insulation disturbance — separate scope (biohazard cleanup after exclusion)
What we DON’T do in attics
- Roofing from the outside — refer to a roofer
- Structural repair of damaged rafters or trusses — may require engineering sign-off, then rebuild
- HVAC duct replacement — coordinate with HVAC contractor
- Electrical work in attics beyond basic safety assessment
Reporting what we found
- Written inspection report with photos of each item
- Specific locations marked with reference to the attic access or landmarks
- Recommendations with trade partners for scopes beyond ours
- Insurance-ready documentation when the inspection is part of a claim
Utah attic venting + insulation code (relevant to attic-leak remediation)
Attic leaks often reveal underlying ventilation or insulation issues. Utah code has specific requirements for attic ventilation and insulation that drive the fix for condensation-related attic leaks. Here’s the practical summary:
- Minimum net free vent area (NFVA): 1 sq ft per 150 sq ft of attic floor, OR 1 per 300 sq ft if balanced soffit + ridge venting with vapor retarder
- At least 40% of ventilation at the soffit (low) and 40% at the ridge or high points
- Soffit vents cannot be blocked by insulation (baffles required where insulation would otherwise block)
- Mechanical ventilation (powered attic fans) is a separate approach; not substituted for passive venting without specific design
- Climate Zone 5 (most of Utah) requires R-49 attic insulation minimum for new construction
- Existing homes meeting prior code standards (R-30, R-38) are grandfathered but upgrade is often advisable
- Blown-in loose fill (fiberglass or cellulose) is standard; batt insulation also acceptable
- Air sealing at ceiling plane required before insulation install
Why these matter for attic-leak remediation
- Condensation attic leaks are driven by moist indoor air escaping to a cold attic + insufficient ventilation to carry moisture away
- Fixing the leak means fixing the moisture-escape path AND fixing the ventilation
- Just replacing wet insulation without addressing air-leakage or venting means next winter the problem returns
Specific issues we see in Utah attics
- Blocked soffit vents: blown-in insulation installed over the eave areas without baffles; soffit vents are effectively sealed shut
- Insufficient high-vent area: ridge vent not continuous or box vents too few; air exchange is poor
- Air leaks at ceiling plane: bathroom exhaust fan not venting outside; recessed can lights not sealed; attic hatch poorly sealed; dropped ceiling light fixtures
- Dropping R-value from settling: blown-in insulation settles over time; what was R-38 becomes R-30 effectively
What a thorough attic-leak remediation includes
- Diagnose the leak source (roof penetration, ventilation condensation, plumbing, or combination)
- Remove saturated insulation (bagged and disposed; sometimes biohazard-rated if rodent contamination)
- Dry the roof deck and framing (fans + dehu + heating if needed)
- Address the leak source itself (roofer for roof penetrations; HVAC for ductwork; us for ceiling air sealing)
- Fix ventilation if condensation was the cause (add baffles, add vents, add continuous ridge)
- Replace insulation to current code where feasible (not required but worth it)
- Final verification (visual, moisture, condition)
Who does what on an attic rebuild
- Us: mitigation, insulation removal + replacement, air sealing at ceiling plane, documentation
- Roofer: roof penetration flashing, shingle work
- Insulation contractor: baffle installation, blown-in replacement for larger scopes
- HVAC: duct repair, bathroom exhaust proper venting
Common upgrade decisions during attic remediation
- Upgrade R-38 to R-49 while insulation is out anyway — incremental cost small
- Install continuous baffles at the eaves — prevents repeat soffit-vent blockage
- Install continuous ridge vent if the ridge-vent coverage is inadequate
- Vent bathroom exhaust fans properly to the exterior (not just “to the attic”)
- Seal recessed can light penetrations through the ceiling plane
Insurance treatment of attic upgrades
- Mitigation covered under water-damage claim
- Insulation replacement to pre-loss R-value: covered
- Upgrade to higher R-value: homeowner-paid delta (unless code required an upgrade)
- Ventilation improvements: covered if the venting was directly damaged by the loss; otherwise homeowner-paid or qualifying as code upgrade
- Air sealing: usually covered as part of insulation replacement scope
Attic remediation that doesn’t address the underlying cause is a short-term fix. Our scope typically includes the diagnostic + whichever upgrades we can perform within our GC license, and coordinated referrals for anything beyond.
Ice dams: Utah-specific response + prevention
Ice dams are a specific Utah winter problem that produces attic + ceiling + wall water damage. Here’s the detail on Utah-specific patterns + what to do during the event + how to prevent next time:
- Warm air from the heated home rises to the attic
- Attic insulation is inadequate OR air-leakage from the ceiling plane is excessive
- Snow on the roof above the heated area melts; water flows down the roof toward the eaves
- Eaves are over unheated space (overhang) so they stay cold
- Melted water refreezes at the cold eave — forms an ice ridge
- More water backs up behind the ice ridge; eventually seeps under the shingles
- Water enters the roof deck + attic + ceiling + walls below
Utah-specific patterns
- Peak season: January through March, especially after heavy snow + sustained cold
- Highest risk cities: east-bench Salt Lake Valley (Sandy, Draper, Cottonwood Heights foothills) because of snow accumulation
- Highest risk home types: 1970s-80s originals with original (lower-R-value) insulation; split-level homes with multiple roof pitches
- Typical signs: icicles at eaves (sign of ice dam), interior ceiling stains at exterior-wall perimeter
What to do during an active ice dam event
- Don’t try to remove the ice dam yourself with pick + axe — damages shingles
- Don’t salt the ice — damages roof + landscape
- Place a towel or container under the interior leak to catch water
- Call us for interior water-damage mitigation
- Call a roofer for exterior ice-dam removal (steam machine is the safe method)
- Keep interior HVAC on normal temperature — don’t crank heat higher thinking it helps (makes it worse)
What we handle on an ice-dam event
- Water extraction from affected areas (ceiling, walls, attic insulation)
- Containment to prevent water migration
- Drying setup for insulation + framing + drywall
- Material-removal decisions (saturated insulation almost always comes out)
- Documentation for insurance claim
What we don’t handle on an ice-dam event
- Exterior ice removal (roofer specialty with steam equipment)
- Shingle repair if the ice-dam damaged roofing
- Snow removal from the roof
Insurance coverage for ice-dam damage
- Most Utah homeowner policies cover sudden ice-dam damage
- “Sudden” is key — chronic ice damming over multiple winters may be denied as maintenance issue
- Keep documentation of the event + prompt response
- Scope letter typically approved within normal timeline
Prevention: what prevents next winter’s ice dam
- Air sealing at ceiling plane: seal recessed can lights, attic hatch, vent-penetration gaps — most impactful single improvement
- Insulation upgrade: top up from R-30 or R-38 to current R-49 standard
- Baffles at eaves: ensure soffit ventilation isn’t blocked by insulation
- Continuous ridge vent: if existing ridge vent is inadequate or box-vents only
- Bathroom exhaust fan properly vented outside: not just “to the attic” which adds moisture + heat
Prevention timeline
- Air sealing + insulation upgrade: best done in fall (September-November) before snow season
- Ridge vent + attic ventilation: anytime but easier in dry seasons
- Our Protection Plan fall inspection includes ice-dam prevention check
What NOT to spend money on
- Heat tape on the roof — costs continuous electricity + treats symptom not cause
- Rooftop snow melt systems — expensive + usually unnecessary with proper insulation
- Aesthetic-only roofing changes if insulation + ventilation aren’t addressed
Ice dam prevention is cheaper + more durable than treating ice dams every winter. If you had one last winter, this fall is the time to address the underlying issue.
Attic mold — sources beyond the obvious roof leak
Not every attic mold job traces to a visible roof leak. Several sources produce the same symptom (mold on the underside of roof sheathing) through different mechanisms. Here are the usual culprits in SJ homes:
Attic mold — how it is remediated, and how to stop it coming back
South Jordan attics see mold from ice-dam leaks, roof penetrations, and bath fans venting into the attic instead of outside.