
Mold removal from True Day: containment, HEPA air scrubbing, removal of affected materials and antimicrobial treatment with thymol or accelerated hydrogen peroxide, then fixing the moisture source so it doesn’t return. Mold work carries a 90-day warranty. Live-answered 24/7 from South Jordan, UT.
Mold Removal Services in South Jordan, UT
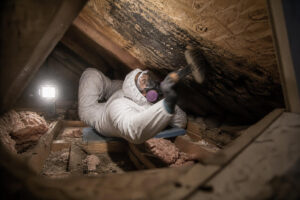 Mold removal is not a cleaning project. That distinction matters — because the instinct when you find mold is to clean the surface it is on, and cleaning the surface is exactly the wrong approach for any mold that has penetrated into a porous building material.
A mold colony on a wall is not sitting on top of the drywall. It has extended hyphae — the thread-like filamentous structures that constitute the absorptive root system of the fungal organism — through the paper facing of the gypsum board and into the substrate behind it. Those hyphae are alive. They are the part of the organism that feeds, grows, and will establish a new visible colony on the surface once conditions allow. Cleaning, encapsulating, or painting over the surface does nothing to the hyphae beneath it. The colony reappears. The cycle continues.
Physical removal of the contaminated material — cutting it out, bagging it, and removing it from the building under conditions that prevent spore redistribution — is the only intervention that eliminates the colony rather than concealing it. That is mold removal. Everything else is a temporary cosmetic.
We get calls that start the same way: “I painted over it and it came back.” Sometimes twice. Sometimes three times. There is a specific frustration in that experience — the sense that you handled it, that you did the reasonable thing, and the wall disagreed. By the time most South Jordan homeowners call us, they have already spent money on paint, on commercial mold spray, on a can of Killz. None of it worked, because none of it reached the part of the organism that matters. We are going to explain exactly why — and what actually does.
We have also taken calls that start differently — from Daybreak homeowners who discovered mold not from a single appliance failure but from a slow, ongoing water intrusion that turned out to be a construction defect: an improperly flashed window rough opening, a missing kickout flashing at a roof-to-wall intersection, a weep screed installed too close to grade. These are not hypothetical scenarios. Daybreak’s rapid construction timeline and its mix of production builder styles produced a documented pattern of moisture intrusion defects in some homes — defects that, by the time they are discovered, have created mold conditions behind finished surfaces that have been growing undisturbed through multiple seasons. We do not approach these projects differently in terms of protocol. We do approach them differently in terms of scope expectation — because construction-defect moisture intrusion is rarely limited to the obvious wall.
True Day Water Damage Restoration is a licensed Utah Contractor (#960332-3505) and IICRC-Certified Firm (ID #927354-5258), based at 11268 S 2865 W in South Jordan. We provide physical mold removal throughout Salt Lake County under the ANSI/IICRC S520 Standard for Professional Mold Remediation — from initial moisture source identification through containment, physical removal, structural drying, and complete general contractor reconstruction.
Call us at (385) 247-9359.
Mold removal is not a cleaning project. That distinction matters — because the instinct when you find mold is to clean the surface it is on, and cleaning the surface is exactly the wrong approach for any mold that has penetrated into a porous building material.
A mold colony on a wall is not sitting on top of the drywall. It has extended hyphae — the thread-like filamentous structures that constitute the absorptive root system of the fungal organism — through the paper facing of the gypsum board and into the substrate behind it. Those hyphae are alive. They are the part of the organism that feeds, grows, and will establish a new visible colony on the surface once conditions allow. Cleaning, encapsulating, or painting over the surface does nothing to the hyphae beneath it. The colony reappears. The cycle continues.
Physical removal of the contaminated material — cutting it out, bagging it, and removing it from the building under conditions that prevent spore redistribution — is the only intervention that eliminates the colony rather than concealing it. That is mold removal. Everything else is a temporary cosmetic.
We get calls that start the same way: “I painted over it and it came back.” Sometimes twice. Sometimes three times. There is a specific frustration in that experience — the sense that you handled it, that you did the reasonable thing, and the wall disagreed. By the time most South Jordan homeowners call us, they have already spent money on paint, on commercial mold spray, on a can of Killz. None of it worked, because none of it reached the part of the organism that matters. We are going to explain exactly why — and what actually does.
We have also taken calls that start differently — from Daybreak homeowners who discovered mold not from a single appliance failure but from a slow, ongoing water intrusion that turned out to be a construction defect: an improperly flashed window rough opening, a missing kickout flashing at a roof-to-wall intersection, a weep screed installed too close to grade. These are not hypothetical scenarios. Daybreak’s rapid construction timeline and its mix of production builder styles produced a documented pattern of moisture intrusion defects in some homes — defects that, by the time they are discovered, have created mold conditions behind finished surfaces that have been growing undisturbed through multiple seasons. We do not approach these projects differently in terms of protocol. We do approach them differently in terms of scope expectation — because construction-defect moisture intrusion is rarely limited to the obvious wall.
True Day Water Damage Restoration is a licensed Utah Contractor (#960332-3505) and IICRC-Certified Firm (ID #927354-5258), based at 11268 S 2865 W in South Jordan. We provide physical mold removal throughout Salt Lake County under the ANSI/IICRC S520 Standard for Professional Mold Remediation — from initial moisture source identification through containment, physical removal, structural drying, and complete general contractor reconstruction.
Call us at (385) 247-9359.
Why Physical Removal Is Not Optional for Porous Materials
The irreducibility of physical removal for mold-contaminated porous materials is grounded in the biology of the organism and the chemistry of available treatments — not in industry preference or liability concerns. Understanding why helps explain why the process looks the way it does.The Penetration Depth Problem
Common indoor mold species penetrate porous building materials to depths that surface treatments cannot reach. In gypsum drywall, mycelial penetration typically extends 1 to 5 millimeters into the paper facing — beyond the reach of any surface-applied antimicrobial. In wood framing with visible surface mold, hyphae penetrate 3 to 10 millimeters into the wood grain depending on species and exposure duration. Aspergillus niger and Stachybotrys chartarum, which require sustained chronic moisture and produce robust mycelial networks, tend toward deeper penetration than species like Cladosporium that colonize cooler, less wet surfaces. In fiberglass batt insulation, mold colonizes the individual glass fibers throughout the batt thickness — not just the surface — because the fibrous matrix provides ideal surface area for hyphal adhesion with minimal resistance to penetration. No treatment of any kind penetrates insulation effectively; removal is always required.The Substrate Reservoir Problem
Beyond penetration depth, cellulose-based building materials — the paper facing of drywall, the wood fiber in oriented strand board, the plant-derived cellulose in standard insulation batts — function as a nutrient reservoir for mold growth. Mold that has colonized these substrates does not need external nutrient input to re-establish a new surface colony from surviving hyphae. As long as the substrate material remains in place, the organic nutrient source that sustains the colony remains in place with it. This is the mechanism that makes mold recurrence after surface treatment nearly inevitable — the colony’s food supply is structurally part of the building material.The Spore Release Problem
A mold colony under undisturbed conditions releases spores into the air at a relatively low background rate. A mold colony that is physically disturbed — scraped, wiped, cut, or subjected to airflow from a household fan — releases spores at orders of magnitude higher concentration in a very short period. This burst release is the mechanism by which uncontained mold removal turns a localized wall cavity problem into a whole-building air quality problem. Spores released during uncontained removal settle throughout the building, and under the right moisture conditions, establish new colonies in every room they reach. Containment and HEPA air filtration during removal exist specifically to capture this burst release before it can distribute.What We Remove and What We Do Not
The skill in mold removal is accurate discrimination between materials that require physical removal and materials that can be treated in place — removing exactly what needs to go, preserving exactly what can be saved. Both errors are costly: removing salvageable material unnecessarily increases reconstruction cost; leaving contaminated material that should have been removed produces recurrence that requires a second remediation project.Materials That Must Be Physically Removed
- Gypsum drywall with hyphae penetration beyond the paper facing: Any drywall where the mold has penetrated into the gypsum core — confirmed by the depth of staining, the duration and degree of moisture exposure, or the species involved — must be fully removed. We cut clean lines at structural members, removing the minimum panel area the data supports while creating clean, square edges for reconstruction.
- Any drywall contaminated by Stachybotrys chartarum: Stachybotrys requires chronically saturated cellulose to establish and produces a dense, cohesive mycelial mass that penetrates deeply into paper facing. Because of its association with mycotoxin production under certain conditions and its deep substrate penetration, all Stachybotrys-contaminated drywall is removed regardless of the surface presentation. Learn more about our black mold removal services.
- Fiberglass batt and cellulose insulation: Always removed when contaminated. The fibrous matrix cannot be effectively treated or dried in place, and the cellulose content provides ongoing nutrient availability even after treatment. Insulation that looks dry may be harboring viable hyphae in its interior structure.
- Oriented strand board subfloor and roof sheathing with through-colonization: OSB panels whose resin-bonded wood fiber has been colonized through more than the surface layer — typically confirmed by the penetrating moisture meter readings and the duration of wet conditions — are replaced. OSB with limited surface colonization and no confirmed through-penetration may be treated in place following wire brushing.
- Carpet, carpet padding, and soft furnishings: No carpet or padding that has been colonized by mold is retained. The fibrous matrix provides ideal hyphal adhesion and cannot be disinfected to any standard that addresses the organism through its full thickness.
- Any porous material colonized following Category 2 or Category 3 water exposure: Grey water and sewage-contaminated materials that have developed secondary mold growth — a common outcome when Category 2 or Category 3 water damage is not promptly and completely remediated — are removed as a combined sewage-contamination and mold event. Learn more about our sewage cleanup services.
Materials That May Be Treated In Place
- Structural wood framing with surface colonization only: Wood framing where mold is confirmed to be limited to the surface — by calibrated moisture meter readings showing no deep saturation, by species identification indicating a surface-limited colonizer, and by the absence of hyphae visible in freshly exposed wood grain — may be treated in place. Treatment involves mechanical cleaning by wire brushing or sanding to remove the spore-laden surface layer, followed by EPA-registered antimicrobial treatment at label concentration, followed by a film-forming encapsulant that seals the treated surface.
- Concrete block and poured concrete: Non-porous concrete surfaces colonized by surface mold — typically Cladosporium and Penicillium on basement walls with condensation issues — can be thoroughly cleaned and treated in place. The concrete itself does not support deep hyphal penetration in the way that cellulose-based materials do, making surface treatment more durably effective.
- Ceramic tile and non-porous hard surfaces: Tile and other non-porous surfaces with visible mold growth are cleaned and treated with EPA-registered antimicrobials. The tile itself is retained; assessment of the substrate beneath it determines whether the tile must be removed to access and treat the mortar bed and substrate below.
The Mold Removal Process — Step by Step
Step 1 — Pre-Removal Moisture Mapping
Before any material is disturbed, we map the complete extent of moisture and mold using FLIR thermal imaging cameras and calibrated penetrating moisture meters. The moisture map defines the true scope of removal — because moisture wicks into building materials by capillary action well beyond the boundary of visible mold growth. In a typical South Jordan basement where foundation seepage has established a mold colony on the lower four feet of a finished wall, our thermal imaging routinely shows moisture extending 12 to 18 inches above the visible mold boundary in the wall framing behind the drywall. The removal line is set by the moisture data, not by the visual colony boundary — because removing only the visibly affected area leaves wet framing that will re-establish a new colony on the fresh drywall installed over it. The moisture map also identifies the source of the moisture that enabled the colony — the failed plumbing fitting, the condensate drain overflow, the ice dam intrusion pathway, the foundation crack seepage point. Mold removal without moisture source identification is an incomplete project. Learn more about our mold inspection and testing services.Step 2 — Containment Establishment
Physical containment barriers — six-mil polyethylene sheeting sealed to walls, ceiling, and floor with tape and foam — are installed around the perimeter of the work zone before any mold-contaminated material is touched. HEPA air scrubbers are set to negative air pressure mode: drawing air from inside the containment through true HEPA filtration — which captures 99.97% of particles at 0.3 microns, well below the 1-to-40-micron diameter range of common mold spores — before exhausting to the building exterior. This establishes a containment zone with slightly lower air pressure compared to the surrounding clean areas within the building. Any air infiltration around containment barriers flows inward — from clean to contaminated — rather than outward. Mold spores released during removal cannot migrate to unaffected rooms, HVAC registers, or other surfaces throughout the building. They are captured by the HEPA filtration before they can travel. We maintain negative air pressure throughout the entire removal phase. Equipment is not turned off during material removal, during breaks, or during any other interruption in the work. Learn more about our air scrubbing and HEPA filtration services.Step 3 — Technician PPE
All technicians entering the containment zone during mold removal wear N95 or P100 particulate respirators — matched to the species and concentration present — nitrile gloves, chemical-splash safety goggles, and disposable Tyvek coveralls. For Stachybotrys chartarum remediation, where mycotoxin aerosol exposure is a concern in addition to spore inhalation, powered air-purifying respirators with P100 filtration provide more consistent protection than half-face filtering facepiece respirators. Coveralls are doffed within the containment zone to a biohazard bag before technicians exit to the clean area — preventing the transport of spores on clothing surfaces through unaffected rooms.Step 4 — Misting Before Cutting
Before any cutting or tearing of mold-contaminated materials, the affected surface is lightly misted with water or a light antimicrobial solution. Misting wets the surface mold and increases the mass of spore-bearing particles, reducing the number that become airborne during physical disturbance. This is a simple step that meaningfully reduces spore release into the containment air during the cutting phase — even with HEPA filtration running, reducing the source term reduces the filtration load.Step 5 — Physical Material Removal
Mold-contaminated materials are removed systematically within the containment zone. Drywall is scored and cut at structural members using scoring knives or oscillating tools — not reciprocating saws, which create excessive vibration and airborne particulate. Material is cut to clean lines at studs and joists rather than pulled or torn, producing edges that require minimal preparation for reconstruction. All removed material is double-bagged in heavy-duty polyethylene within the containment zone before being carried out — never carried loose through clean areas of the home. Bags are sealed and transported for disposal. For structural wood framing with surface-only colonization that is being treated in place rather than removed, the surface is mechanically cleaned by wire brushing or low-grit sanding to remove the spore-bearing surface layer and expose clean wood grain for antimicrobial treatment. This step is performed within the containment zone with HEPA air scrubbers running.Step 6 — EPA-Registered Antimicrobial Treatment
All exposed structural surfaces within the remediated area — framing, blocking, concrete, masonry, and any retained building materials — receive EPA-registered broad-spectrum antimicrobial treatment. Products are selected for documented efficacy against the mold genera identified or suspected in the specific project and are applied at manufacturer-specified concentrations with required dwell times. We apply a minimum of two treatment passes with appropriate dwell time between applications. For exposed wood framing following Stachybotrys remediation, a film-forming encapsulant is applied after antimicrobial treatment — sealing the treated wood surface against residual spore deposits and providing a visual indicator during future inspections that the framing was treated. The encapsulant does not substitute for physical removal of contaminated material; it is a supplemental treatment for framing that met the criteria for retention.Step 7 — HEPA Vacuuming of All Surfaces
After material removal and antimicrobial treatment and before the containment is removed, all surfaces within the work zone receive a thorough HEPA vacuum pass — walls, floors, framing, structural members, any remaining materials, and the containment barrier itself. Standard vacuum cleaners exhaust captured particles back through their filtration into the room air. HEPA vacuum filtration — rated at 99.97% efficiency at 0.3 microns — removes settled spore deposits from all surfaces rather than redistributing them. This step is performed last, after all other removal and treatment work is complete, to address any spores that settled during the earlier phases of work.Step 8 — Containment Removal and Final Air Scrubbing
After HEPA vacuuming is complete, containment barriers are carefully removed — folding inward on themselves to trap any surface spore deposits — and bagged for disposal. HEPA air scrubbers continue running in the now-open remediated area for an additional period to address any ambient spore concentrations before the area is released for clearance testing.Step 9 — Structural Drying to Verified Completion
With materials removed and the structure open, we deploy industrial low-grain refrigerant dehumidifiers and high-velocity air movers to drive the structure to verified dryness. The moisture source must be corrected — by repair of the failed fitting, correction of the drainage condition, or repair of the building envelope intrusion pathway — before drying equipment is placed. Drying over an unresolved moisture source produces minimal progress and cannot be verified as complete. Equipment is monitored daily. Moisture readings at all monitoring points are recorded until all materials return to equilibrium moisture content within the IICRC S520 and S500 dry standard for each material class. Learn more about our structural drying and dehumidification services.Step 10 — Post-Remediation Clearance Testing
We recommend independent post-remediation clearance testing before reconstruction begins. An independent certified industrial hygienist — separate from True Day, maintaining the industry-standard separation between the remediating contractor and the verifying party — collects air samples and, where warranted, surface samples from the remediated area. Laboratory analysis provides spore counts and species identification that can be compared against background samples from unaffected areas of the building and against seasonal outdoor baseline data. A passing clearance — spore counts and species profile within the normal background range — provides objective, third-party confirmation that the remediation achieved the standard required before reconstruction. This documentation is increasingly expected by insurance carriers, real estate transaction parties, and — in cases where the home’s occupants have experienced health effects related to mold exposure — by medical providers evaluating those effects. Learn more about our mold inspection and testing services.Step 11 — Licensed General Contractor Reconstruction
With a passing clearance in hand, our licensed general contractor team (Utah License #960332-3505) performs all reconstruction — replacing drywall, insulation, flooring, trim, and all finish work needed to return the space to pre-loss condition. Where vapor retarder installation or enhanced building envelope sealing is indicated to reduce the risk of future moisture intrusion, we incorporate those measures into the reconstruction scope. Learn more about our reconstruction and repair services.Where We Find Mold Most Often in South Jordan Homes
Our removal projects in South Jordan follow predictable patterns — shaped by the city’s water chemistry, its climate, its construction eras, and its soil. Knowing where to look is half of what makes the initial assessment accurate.Aspergillus and Penicillium in Daybreak’s Second-Floor Assemblies — The Hard Water Supply Line Pattern
Daybreak has been the subject of documented community conversations about construction quality — particularly around moisture intrusion through building envelope assemblies in homes built during the rapid 2007–2015 development period. We have responded to mold projects in Daybreak where the immediate cause was an appliance failure but the underlying conditions that made the mold severe — tight building envelope, limited natural ventilation, finishes that concealed moisture migration — were architectural. And we have responded to projects where the appliance failure was incidental and the real story was a flashing defect that had been quietly saturating a wall assembly for two or three winters. In both cases the mold removal protocol is the same. What changes is where we point the thermal camera first. Daybreak’s post-2006 contemporary craftsman and modern farmhouse construction places bathrooms and laundry rooms on the second floor at a rate that creates a specific and recurring mold risk. When a washing machine supply hose — weakened by mineral scale from the Jordan Valley Water Conservancy District’s hard water supply at 7 to 10 grains per gallon — fails on a Saturday evening, the water that enters the floor-ceiling assembly between the second floor and the main floor below may go undetected until Monday morning. By that time the oriented strand board subfloor has been wet for 36 to 48 hours — the threshold at which mold germination on the wood fiber surface is no longer a risk but a probability. Aspergillus and Penicillium are the species we most frequently encounter in this scenario. The removal involves cutting the ceiling drywall below, removing any colonized insulation from the joist cavity, treating the exposed framing, and verifying drying of the OSB above before the ceiling is rebuilt.Cladosporium on Roof Sheathing — Multi-Season Ice Dam Intrusion Along the Wasatch Front
The Wasatch Front’s freeze-thaw cycles — the January and February pattern of overnight lows well below freezing followed by daytime temperatures above 32°F — produce ice dam conditions on the low-slope and flat rooflines common throughout South Jordan’s residential construction. Meltwater forced under the roofing membrane saturates the oriented strand board roof sheathing and the insulation below it. Attic mold — almost always Cladosporium on the underside of the sheathing, sometimes with Penicillium on the insulation surface — frequently develops through two or three winter cycles before a homeowner accesses the attic for any reason and finds extensive dark staining on the decking above. The removal involves access through the attic hatch, HEPA containment within the attic space, removal of colonized insulation, wire brushing of the sheathing underside where colonization is limited to the surface, and replacement of sheathing sections where through-penetration is confirmed. Learn more about attic leak damage.Chronic Seepage and Aspergillus in Pre-2000 Foundation Walls Along the 10200 South and 11400 South Corridors
South Jordan’s established neighborhoods — in the corridors near 10200 South and 11400 South, in the communities near the Jordan River parkway — contain a significant inventory of pre-2000 construction with finished basements whose foundation walls are subject to chronic low-level groundwater seepage. The expansive clay soils left by ancient Lake Bonneville — montmorillonite-rich smectite that swells when saturated and contracts when dry — create seasonal lateral pressure on poured concrete and concrete block foundations, gradually opening hairline cracks and cold joint seals. Chronic seepage through these pathways produces persistently elevated basement humidity that supports Cladosporium and Aspergillus growth on stored materials and drywall paper facing over months rather than days. The removal in these situations is typically the lower three to four feet of perimeter drywall, with moisture source assessment focused on identifying and documenting the specific intrusion pathway for insurance and for permanent correction. Learn more about our basement flooding cleanup services.Crawl Spaces with Uncontrolled Vapor Transmission
South Jordan crawl spaces — particularly in homes with unencapsulated or partially encapsulated dirt floors — experience persistent elevated relative humidity from direct soil vapor evaporation. This sustained moisture environment supports Cladosporium, Penicillium, and Chaetomium growth on floor joists, rim joists, and the kraft-faced insulation batts attached to the subfloor above. Chaetomium — identifiable by its distinctive musty odor more pungent than the earthy musty of Cladosporium — is among the strongest indicators that a crawl space has been chronically damp for an extended period. Removal in crawl spaces involves working in a low-clearance, high-humidity environment that requires specialized positioning of both technicians and HEPA equipment to maintain effective negative air pressure containment. One of our reviewers described a crawl space project this way: “I had no idea how bad it was until they showed me the thermal images. The mold was everywhere under my floor and I had no idea. They explained what they were doing every day and the before-and-after was remarkable.” That description — not knowing what was directly below the floor you walk on every day — captures what crawl space mold remediation actually means for the people living above it. Learn more about our crawl space moisture services.A Mold Removal Project in South Jordan
In late September 2023, we were contacted by a homeowner near 10600 South in an established South Jordan neighborhood — a 1997-era split-level with a finished lower level that had experienced an undetected slow drip from a compression fitting on the cold-water supply to a basement bathroom vanity. The fitting had been seeping at a rate too slow to produce visible standing water but sufficient to keep the wall cavity and adjacent framing at elevated moisture content for an estimated four to five months based on the depth and character of the mold colonization we found. The caller’s first description was specific: a dark discoloration on the lower portion of the drywall in the utility room adjacent to the bathroom, roughly two feet wide and running from the baseboard to about 18 inches up the wall. They had painted over it once. It came back darker. That pattern — paint applied over mold growth, colony re-establishing through the paint layer within weeks — is one of the clearest indicators we hear in initial calls that the material requires physical removal rather than surface treatment. Our FLIR thermal imaging scan on arrival showed a cold zone extending to 26 inches above the visible mold boundary on the affected wall and into the adjacent wall behind the bathroom vanity — a wall the homeowner had not identified as affected because there was no visible discoloration on the bathroom side. Calibrated moisture meter readings at 11 points showed the framing in the utility room wall reading between 21% and 29% — above the 12% to 16% dry standard for dimensional framing lumber in this climate zone. The bathroom vanity wall framing was reading 18% at three points — below the removal threshold but above verified dry standard, indicating moisture migration had reached that assembly without producing visible colonization yet. The species present — confirmed by the laboratory analysis of the clearance test conducted after removal — were Aspergillus and Penicillium, at concentrations in the initial air sample that were approximately 8 times the outdoor background spore count for the season. These are the two species we encounter most frequently in South Jordan supply-line failure events, and in this case they had established a well-developed mycelial network in the drywall paper facing over the four-to-five-month exposure period. We established containment on the utility room and initiated HEPA negative air pressure before any material was disturbed. We removed the drywall from the utility room wall to the full extent defined by the thermal imaging — 26 inches above the visible boundary rather than to the visible boundary — and removed the vanity in the bathroom to access the wall framing behind it. The framing in the bathroom wall was treated in place: wire brushed, treated with a quaternary ammonium-based EPA-registered antimicrobial at label concentration, followed by a second application of a film-forming encapsulant. The utility room wall framing received the same treatment sequence after all material was out. Structural drying equipment ran for four days after the compression fitting was repaired and the supply was verified dry. The day-four readings at all 11 monitoring points were within the 11% to 15% range. The independent clearance air sample, taken on day six, returned spore counts within normal seasonal background. The utility room drywall reconstruction and the bathroom vanity reinstallation were completed on day nine. The homeowner’s policy covered the loss as sudden and accidental water damage with a resultant mold component. Documentation submitted included 38 timestamped photographs, the FLIR thermal imaging report with annotated infrared images, the 11-point moisture log, the laboratory clearance report, and the Xactimate scope. Total approved claim: $6,180. Deductible: $1,000. A review left by a homeowner after a similar South Jordan project — one we did not solicit and found only later — read: “They were thorough, professional, and explained everything step by step. I felt like I actually understood what was happening in my own home for the first time.” That is the version of this work we aim for on every project. The technical process is non-negotiable. The communication around it is also non-negotiable. A homeowner who understands what we found, why it requires what we are proposing, and what the space will look like when we are done makes better decisions and has a fundamentally different experience of an event that would otherwise feel completely out of their control. What the homeowner told us at the final walkthrough — the thing she mentioned while we were packing up equipment on day nine — was that she had been attributing chronic congestion to seasonal allergies for the better part of five months. She had an appointment with an allergist scheduled for the following week. She cancelled it. Her symptoms resolved within two weeks of project completion. She was not seeking that outcome when she called us. She called about a dark spot on a wall that kept coming back. Most mold calls are like that. The presenting complaint is cosmetic. The actual problem is biological, structural, and — in this case — breathing the same air as her family every night. The dark spot on the wall was the only visible part of it.Frequently Asked Questions — Mold Removal
Does all mold-affected drywall need to be removed?
Not always. Drywall with surface-only colonization and no confirmed penetration into the gypsum core may sometimes be treated in place through wire brushing, antimicrobial application, and encapsulation. However, any drywall where hyphae have penetrated the gypsum core, any Stachybotrys-contaminated material, and all drywall saturated by Category 2 or Category 3 water must be fully removed. Our assessment with thermal imaging and moisture meters determines which approach applies on a material-by-material basis.How much mold can remain after removal before reconstruction?
None — zero visible mold on any surface within the work area, with post-remediation air sampling confirming spore counts within normal background levels. Reconstruction over any remaining mold produces recurrence on the new building materials. The ANSI/IICRC S520 Standard defines the completion criteria, and independent clearance testing by a certified industrial hygienist provides the objective verification. Learn more about our mold inspection and testing services.How long does mold removal take?
Physical removal typically takes one to three days. Structural drying follows for 3 to 5 days. Clearance testing requires 24 to 72 hours for laboratory results. Reconstruction timelines depend on scope. We provide a detailed project timeline estimate after the initial assessment.What mold species are most common in South Jordan homes?
Cladosporium in attic assemblies and around window frames; Aspergillus and Penicillium in water-damage-related events throughout the valley; Stachybotrys chartarum in basements and attics with chronic sustained wet cellulose; Chaetomium in crawl spaces with long-term vapor transmission issues. Each species has different growth requirements, health implications, and removal protocol considerations.Related Services
- Mold Remediation
- Mold Inspection & Testing
- Black Mold Removal
- Mold Prevention
- Water Damage Restoration
- Moisture Detection
- Structural Drying
- Dehumidification
- Air Scrubbing & HEPA Filtration
- Crawl Space Moisture Damage
- Attic Leaks
- Hidden Leaks
- Sewage Cleanup
- Reconstruction & Repairs
- Drywall Repair
- Insurance Claims Assistance
- Basement Flooding Cleanup
- Mold Remediation — South Jordan, UT
Call True Day for Mold Removal in South Jordan, UT
Mold removal is not a surface cleaning project and it is not a project that improves with delay. The colony grows, the moisture source continues, and the scope of removal expands with every week it remains unaddressed. True Day Water Damage Restoration is licensed, IICRC-certified, locally based in South Jordan, and equipped to find mold where it hides, remove it under proper containment, verify the work through independent testing, and rebuild what came out. True Day Water Damage Restoration 11268 S 2865 W, South Jordan, UT 84095 Phone: (385) 247-9359 Email: info@truedaywaterdamagerestoration.xyz Utah Contractor License: #960332-3505 IICRC Certified Firm ID: #927354-5258- Schedule a Free Assessment →
- View Before & After Photos →
- Read Customer Reviews →
- View Our Credentials →
What True Day guarantees on every job
Our 6-step IICRC S520 mold-remediation sequence
Mold remediation isn’t spray-and-wipe. The IICRC S520 standard defines a specific sequence that keeps spores from migrating to clean areas, confirms the remediation worked, and documents the result for the carrier. Here is each step as we actually run it.
First, the IICRC S520 condition category
Assessment and moisture-source identification
Visible inspection + FLIR thermal + GE Protimeter moisture reading. The moisture source is identified and corrected first — otherwise mold returns within weeks. No water fix, no remediation.
Containment setup
Plastic sheeting creates a sealed work area; negative-air machines with HEPA filtration keep the pressure differential so spores can’t migrate to clean areas. Decontamination chamber at the entry for crew PPE change-out.
Air stabilization during work
HEPA air scrubbers run continuously inside containment at the ACH rate the room size requires (4–6 ACH minimum for S520 work — see our HEPA page for the math). Spores released during demolition are captured before they settle.
Material removal and HEPA vacuuming
Affected porous materials (drywall, insulation, carpet pad) are removed in sealed bags for disposal. Semi-porous materials (framing lumber, concrete) are HEPA-vacuumed and then wire-brushed or sanded if staining remains.
Cleaning and antimicrobial application
Remaining surfaces are wet-wiped with EPA-registered accelerated hydrogen peroxide. HVAC within the affected zone is isolated during work and inspected after. Antimicrobial is applied as a final step, not as a shortcut around removal.
Verification and clearance
Visual inspection, moisture-reading recheck, and — when a formal document is required — independent industrial-hygienist air sampling with lab analysis. We don’t test and clear our own work when the carrier or buyer needs a signed clearance report.
What a mold remediation job looks like from your side
For a typical residential S520 mold remediation project — moderate scope, maybe one room plus adjacent cavity. Timeline + what you need to do each day.
Day-by-day homeowner perspective
| Day | What happens | What you do |
|---|---|---|
| Day 0 | Inspection + scope + agreement signed | Walk the area with us, authorize scope |
| Day 1 morning | Containment setup (plastic sheeting over doorways, negative-air machines running) | Clear personal items from the room if not done. Keep pets + kids out of the containment zone. |
| Day 1 afternoon | Demolition of affected porous materials (drywall, carpet, insulation) | Expect noise + dust. Containment holds dust inside the work zone, but the whole house will know work is happening. |
| Day 2 | HEPA vacuuming of all surfaces, antimicrobial application | Still keep the area closed off. Our techs will tell you when it’s safe to pass through. |
| Day 3 | Structural drying if any residual moisture, final cleanup, post-remediation inspection | Walk the area with the lead tech at end of day. Any concerns raised now. |
| Day 4-14 | Reconstruction (new drywall, paint, flooring, trim) | Smaller daily disruption. Choice of paint/flooring if upgrades desired. |
| Day 14+ | Close-out walkthrough + warranty issued | Verify everything, sign close-out |
What’s uncomfortable but normal
- Dust. Even with containment, some dust reaches the whole home. Keep HVAC filter clean during the job.
- Chemical smell from antimicrobial for 1-2 days post-application. Fades on its own.
- Visible structural gaps (holes in walls, missing floor) between demo and reconstruction. Looks worse before it looks better.
- Equipment noise from HEPA negative-air machines (comparable to a running vacuum, continuously).
Can you stay in the home during remediation?
Depends on scope. Small scope in a non-living-area room (basement laundry, utility closet): yes, usually. Large scope affecting bedrooms or main living areas: often better to stay elsewhere during active demolition phase. We’ll give you an honest read on your specific situation.
How mold is physically removed — the IICRC S520 method
“Mold removal” is the physical removal step inside a larger remediation scope. It is distinct from killing mold (antimicrobial treatment) or encapsulating mold (sealing in place). Here is what the actual removal looks like, step by step:
What’s not removal: spraying antimicrobial on visible mold without physical removal of affected porous material. That’s cleaning, not removal, and it fails S520 standard whenever porous materials were involved.
The decontamination chamber — the physical setup that keeps spores from spreading
Larger mold-removal scopes (over 100 sq ft or Condition 3 widespread) require a decontamination chamber at the entry to the contained zone. The chamber isn’t theater — it’s engineering. Here’s what the setup looks like on-site:
On smaller jobs (under 100 sq ft), a single-zone containment without a full chamber is adequate. The chamber appears when the scope needs it, not as a default — because every chamber adds setup time and cost that shouldn’t be billed when it isn’t required.
How long each phase of mold removal actually takes
Removal phases run on predictable timelines. If someone promises a mold job in a day, something is being skipped. Here is realistic timing for a typical SJ residential mold job:
| Phase | Small job (under 10 sq ft) | Medium job (10-100 sq ft) | Large job (over 100 sq ft) |
|---|---|---|---|
| Inspection + scope writing | Day 0 (first visit) | Day 0 + 24-48 hr for written scope | Day 0 + 48 hr for written scope |
| Containment setup | 2-3 hours | Half day | Full day |
| Removal | Half day | 1-2 days | 3-5 days |
| Cleaning + antimicrobial | Same day as removal | 1 day | 1-2 days |
| Structural drying | 1-2 days | 3-5 days | 5-7 days |
| HEPA dwell before PRV | 24 hours | 24-48 hours | 48 hours |
| PRV sampling + lab turnaround | 1-2 days | 1-2 days | 2-3 days |
| Containment removal | 1-2 hours | Half day | Full day |
| Total mitigation phase | 3-5 days | 7-10 days | 12-17 days |
| Reconstruction phase (added after) | Variable | Variable | Variable |
If a scope you’ve been offered promises 24-48 hours total for a job over 10 sq ft, ask which phases are being combined and whether PRV is included. Fast jobs are usually fast because the verification was dropped.
What’s on the truck when we show up for a mold job
Equipment inventory for a mold-remediation dispatch. The truck is loaded for a specific type of job, so when we arrive the containment and removal can start without a second trip:
The equipment specs match what the IICRC Standard S520 requires for proper remediation. A truck arriving without any one of these categories is a truck starting a job it isn’t ready for.
Where does mold waste go — the regulated reality
Mold-contaminated material is treated specifically to prevent re-contamination during transport and to meet disposal expectations. Here’s the real path from your home to the landfill:
Clean it or remove it? Material by material
The core rule in IICRC S520: porous materials with growth come out; non-porous materials get cleaned; semi-porous materials depend on how deep the growth goes.
| Material | Type | Usual decision |
|---|---|---|
| Drywall | Porous | Remove, cutting back beyond the visible growth line |
| Fiberglass batt insulation | Porous | Remove and discard |
| Carpet and pad | Porous | Discard if growth is present |
| Ceiling tile | Porous | Discard |
| Wood framing | Semi-porous | HEPA vacuum, abrade surface growth, antimicrobial; replace only if structurally compromised |
| Plywood / OSB subfloor | Semi-porous | Clean surface growth; replace if soft or delaminated |
| Concrete | Non-porous (for this purpose) | HEPA vacuum, damp-wipe, antimicrobial |
| Tile, glass, metal | Non-porous | Clean |
| Flex HVAC duct with growth | Porous liner | Replace |
| Rigid metal ductwork | Non-porous | Cleaned by an HVAC duct specialist |
Every removal decision is photographed and listed in your scope, so you and your adjuster can see why each item came out or stayed.
What happens at job close — after clearance passes
Containment does not come down the moment removal ends. Here is the close-out sequence once verification is passed:
- Clearance confirmed in writing before anything is taken apart.
- Final HEPA vacuum of the containment interior, including the poly walls.
- Containment taken down inward — sheeting folded in on itself and bagged so the inside surface never faces the house.
- Equipment cleaned before it leaves — scrubbers and tools wiped and bagged at the exit.
- Exit-path protection removed and the path HEPA-vacuumed.
- HVAC registers unsealed and the zone reconnected to the system.
- Final walk-through with you — what was removed, what was cleaned, what stays open for rebuild.
- Documentation handed over — scope, moisture logs, photos, verification results, written warranty.
- Rebuild scheduled on its own line, so remediation is closed and visible as complete.
Cleaning mold from wood framing — methods compared
Studs, joists, and sheathing usually stay in place. The question is how to get growth off them. The method depends on how deep it goes and how much area is involved.
Your scope lists the method for each area, so you can see what is being done and why.
How mold-contaminated material leaves your home
Getting moldy drywall and insulation out without spreading spores through the house is a step of its own.
- Bagged inside containment. Material is cut and placed directly into heavy-duty plastic bags in the work zone.
- Sealed and wiped. Bags are sealed, and the outside of each bag is HEPA-vacuumed or wiped before it leaves containment.
- Double-bagged at the exit. At the containment exit each bag goes into a second clean bag.
- Carried on a protected path. Bags travel along the covered route straight to the truck — never through unprotected rooms.
- Large pieces wrapped. Items too big to bag are wrapped in sheeting and sealed.
- Disposed of properly. Bagged household mold debris is generally handled as regular construction waste. Material that is also Category 3 sewage-contaminated or regulated, such as asbestos, follows its own rules.